- Step 1: Begin Your AI Journey
- Step 2: Define Your Agent’s Purpose
- Step 3: Choose Your Integration Needs
- Step 4: Set Up Your Data Access
- Step 5: Choose Your Interaction Channel
- Step 6: Give Clear Instructions
- Step 7: Select Your Tools & Services
- Step 8: Upload Your Knowledge & Train Your Bot
- Step 9: Set Up Chat Interface
- Step 10: Configure Triggers (Optional)
- Step 11: Final Configuration and Launch
Are you tired of answering the same customer questions over and over?
It’s a familiar scenario: support agents constantly handle repetitive inquiries, consuming precious hours that could be better spent on more complex customer issues.
In fact, research shows that support teams face an average of 11.9 interruptions per day, often repeating the same explanations. This not only drains time but also leads to frustration for both agents and customers.
But what if there was a way to eliminate this repetitive cycle? Enter the AI Customer Support Assistant—a game changer for modern businesses. Unlike traditional chatbots that are limited to basic scripts, this advanced AI tool can interact with customers in a meaningful way, answering questions, providing explanations, and offering personalized support.
And the best part?
95% of customers prefer getting information from a bot, according to research. By implementing an AI assistant, you can reduce the burden on your support staff by 43%, allowing them to focus on more impactful aspects of customer service. It’s not just automation—it’s a smarter, more efficient way to manage customer support while improving the customer experience.
Ready to transform your customer service?
Let’s dive in!
Step 1: Begin Your AI Journey
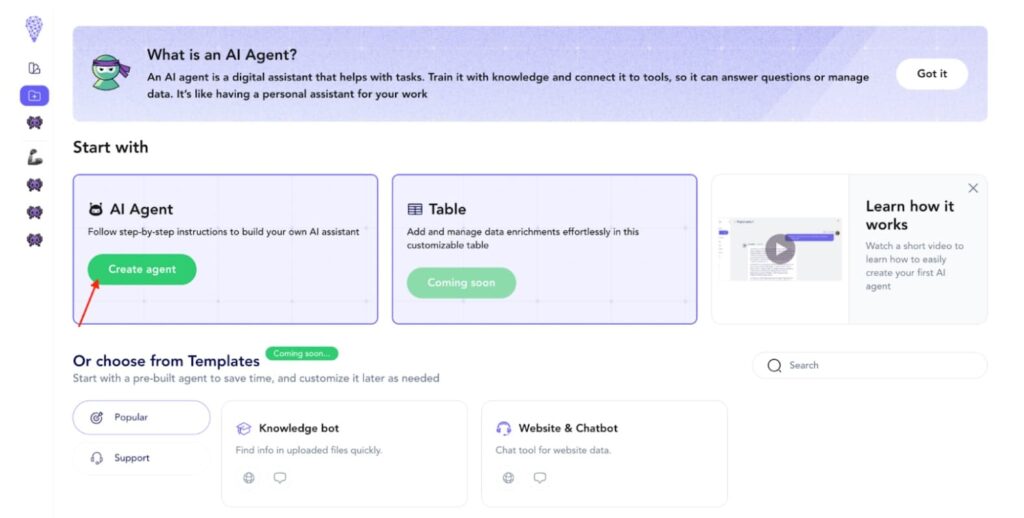
Sign up or log in to Omnimind.ai and start creating your first AI Agent!
Click on the “Get started” button in the Create AI Agent section.
You’ll see a friendly interface that guides you through building your own AI assistant—perfect for creating a knowledgeable support agent who understands your business!
Step 2: Define Your Agent’s Purpose
Let’s set your bot’s mission! Select “Answer with knowledge”—this is perfect for helping customers understand your products and services.
Your bot will be able to:
- Answer questions about products and services
- Explain policies and procedures
- Help with troubleshooting
- Provide relevant examples from your knowledge base

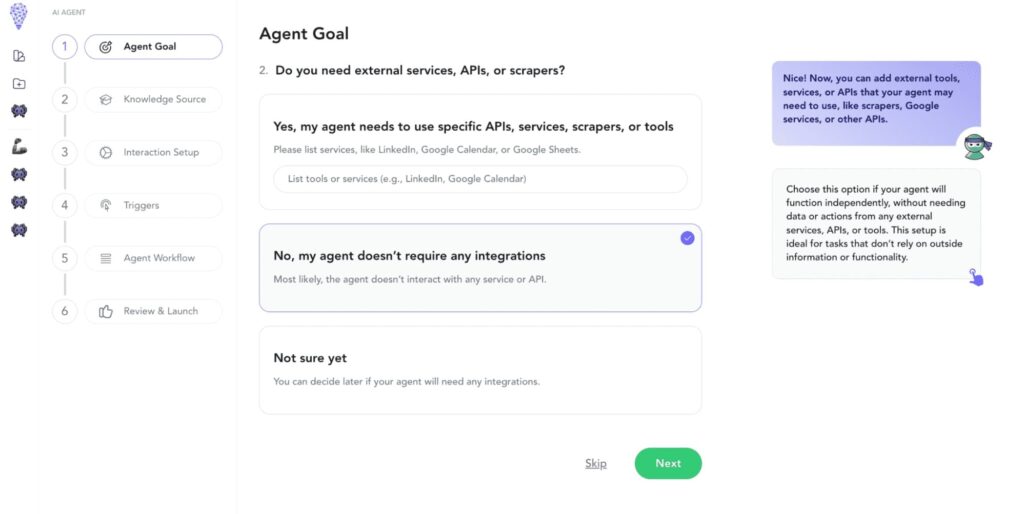
Step 3: Choose Your Integration Needs
For our support bot, let’s keep it focused on your business materials.
Select “No, my agent doesn’t require any integrations”. This setup is perfect for handling customer inquiries using just your uploaded support documentation.
Step 4: Set Up Your Data Access
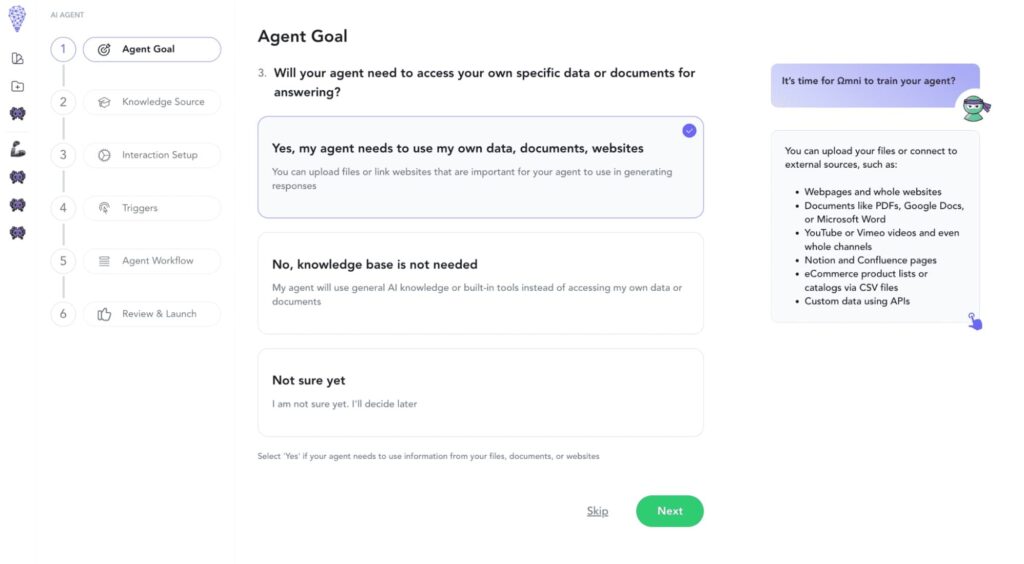
When asked about accessing specific data, select “Yes, my agent needs to use my own data, documents, websites”.
This is crucial because your bot will need to understand your key support materials. Here are the essential documents to upload:
- FAQs and troubleshooting guides – Your most common customer questions and their solutions
- Product documentation – Technical specifications, user manuals, and setup guides
- Company policies – Return policies, warranties, and terms of service
- Pricing information – Product prices, subscription plans, and discount rules
- Support workflows – Step-by-step guides for handling common customer issues
- Service descriptions – Detailed information about your services and features
- Communication templates – Standard responses and escalation procedures
Pro tip: Make sure all documents are up-to-date and in supported file formats (PDF, DOCX, TXT) before uploading.
Step 5: Choose Your Interaction Channel
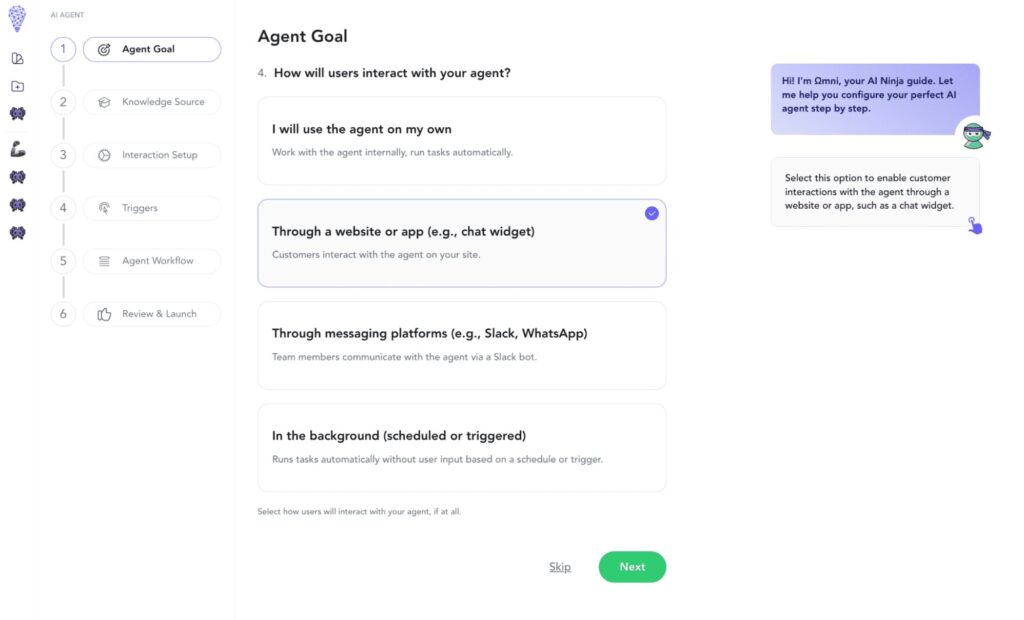
Your customers need easy access to help wherever they are! Choose how you want to connect with them:
- Website Integration: Embed the chat directly on your website for instant support
- WhatsApp Business: Enable WhatsApp integration to provide 24/7 support through the world’s most popular messaging platform, allowing customers to get help through their preferred communication channel
- Multi-channel Support: Combine both website chat and WhatsApp to create a seamless support experience across all touchpoints
The WhatsApp integration is particularly powerful as it lets you:
- Respond to customer queries instantly through their preferred messaging app
- Share images and documents directly in the chat
- Maintain conversation history for better context
- Scale your support globally through a platform your customers already use daily
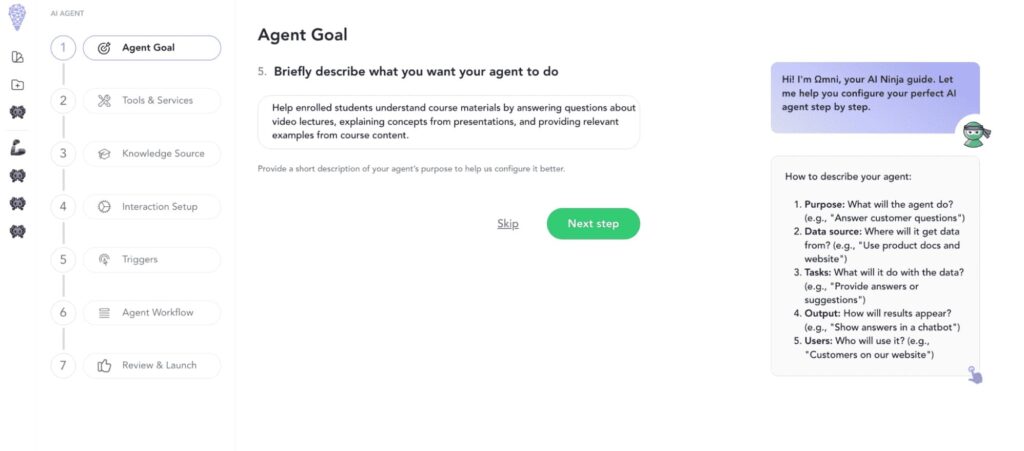
Step 6: Give Clear Instructions
This is where you define exactly how your bot should interact with customers.
Feel free to use a simple prompt to outline some functionalities for your chatbot. If you wish to make it even more sophisticated, here are some examples:
Core Support Functions:
- Answer product and service-related questions
- Provide step-by-step troubleshooting guidance
- Link customers to relevant help articles or documentation
- Share product images and specifications when needed
Proactive Assistance:
- Offer personalized product recommendations based on customer queries
- Suggest related items or complementary products
- Provide shipping and tracking updates
- Send order status notifications
Customer Experience:
- Use a friendly, professional tone
- Follow up with satisfaction surveys after resolution
- Escalate complex issues to human agents
- Collect feedback about products and services
Example instruction:
“Assist customers by answering product questions, providing troubleshooting help, and sharing relevant documentation links. Offer personalized product recommendations when appropriate, provide order tracking updates, and maintain a friendly, professional tone. Escalate complex issues to our support team and collect customer feedback to improve our service.”
Step 7: Select Your Tools & Services
Let’s enhance your support bot with some powerful tools!
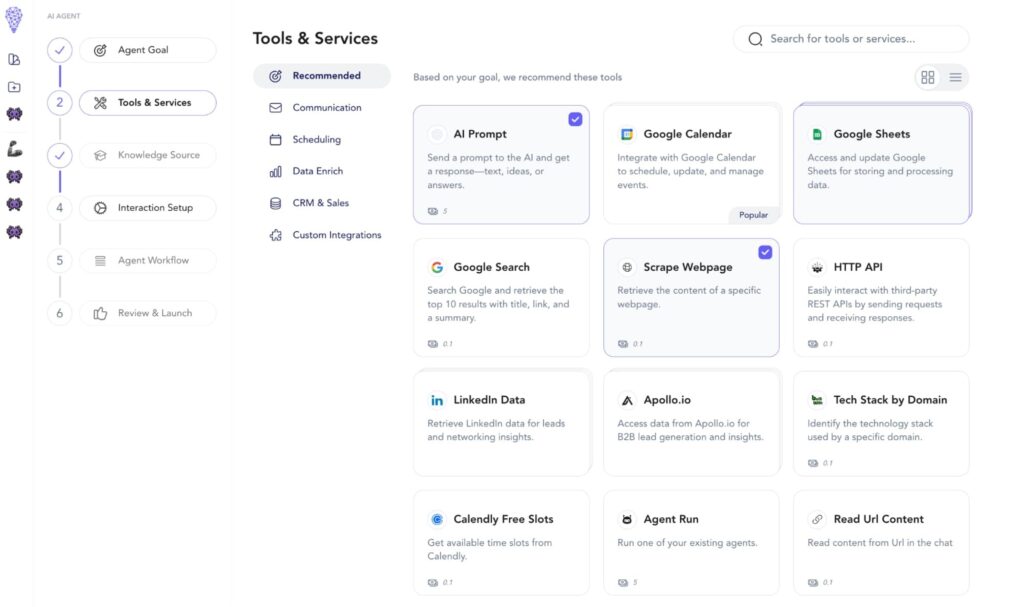
In the Tools & Services section, you’ll want to select:
- AI Prompt: Perfect for generating clear explanations and responses to customer inquiries
- Scrape webpage: Great for pulling information from your website about your products, services, and policies
- Google Sheets: Useful for managing and accessing structured data like pricing or product specifications
You can also explore other helpful tools like:
- Google Calendar for managing support schedules
- Gmail Email Sender for automated follow-ups
- Google Search for finding additional resources
Step 8: Upload Your Knowledge & Train Your Bot
Now it’s time to give your bot access to all your support materials. You can add knowledge in several ways:
Website Links:
- Paste URLs of your help center pages
- Add links to your product documentation websites
- Include links to your policy pages
- Share URLs of your public knowledge base
Google Workspace Integration:
- Paste links to your Google Docs containing support information
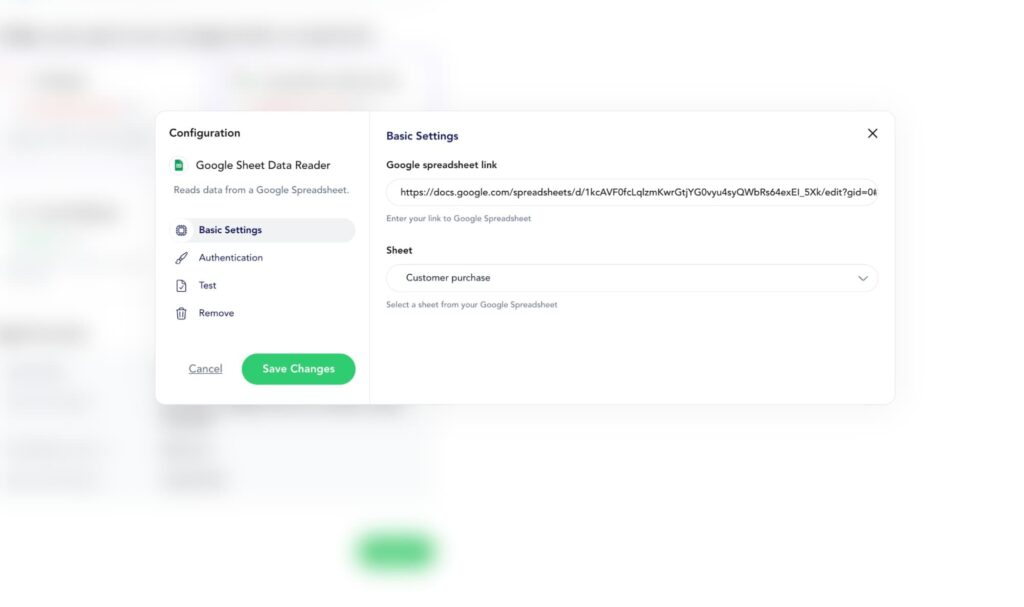
- Add Google Sheets URLs (Important: Also add these same URLs in the “Google Sheet Data Reader” tool configuration for proper access)
- Include links to Google Sites with product information
File Uploads:
- Upload PDFs of product manuals and guides
- Add DOCX files containing policies and procedures
- Include CSV files with product specifications
- Upload TXT files with FAQs and troubleshooting steps
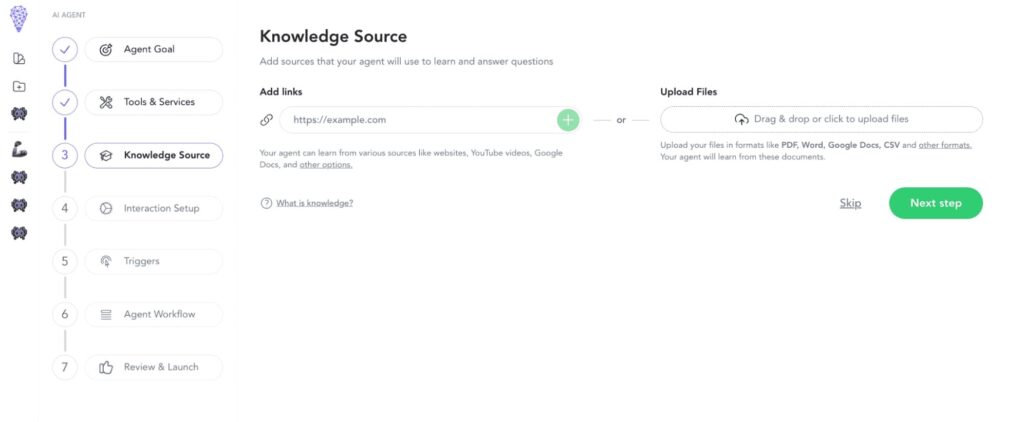
Pro tip: Make sure all your Google Docs and Sheets have appropriate sharing permissions set before adding them as knowledge sources.
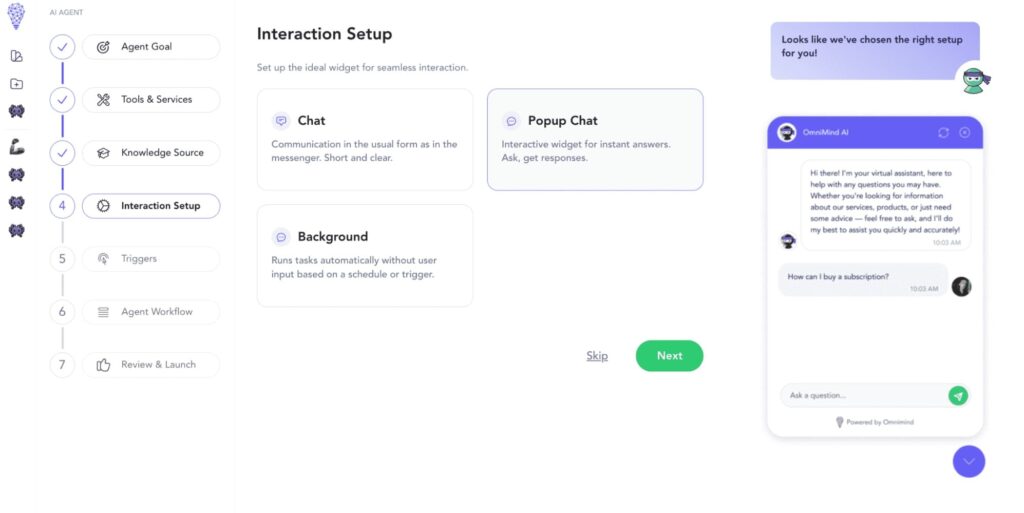
Step 9: Set Up Chat Interface
Select “Popup Chat” as your interface option.
Popup chat is perfect for support chatbots. This will allow you to:
- Embed the chatbot on any page of your website with a simple code snippet
- Deploy across multiple domains and web properties
- Customize the chat widget’s appearance to match your brand
- Position the chat button wherever you want on your pages
- Configure when the chat widget appears to visitors
- Set up on both desktop and mobile versions of your site
After selecting popup chat, you’ll receive an embed code that you can add to any webpage where you want the chat widget to appear. The chat will appear as a floating button that expands into a full chat window when clicked, providing a seamless experience for your visitors.
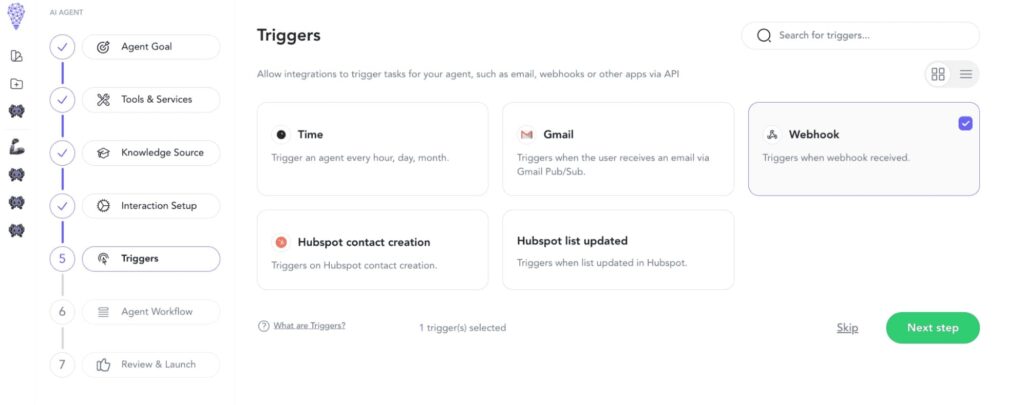
Step 10: Configure Triggers (Optional)
While your bot will primarily respond to customer questions, you can also set up helpful automated interactions:
- Follow-up satisfaction surveys
- Regular check-ins on open issues
- Automated status updates
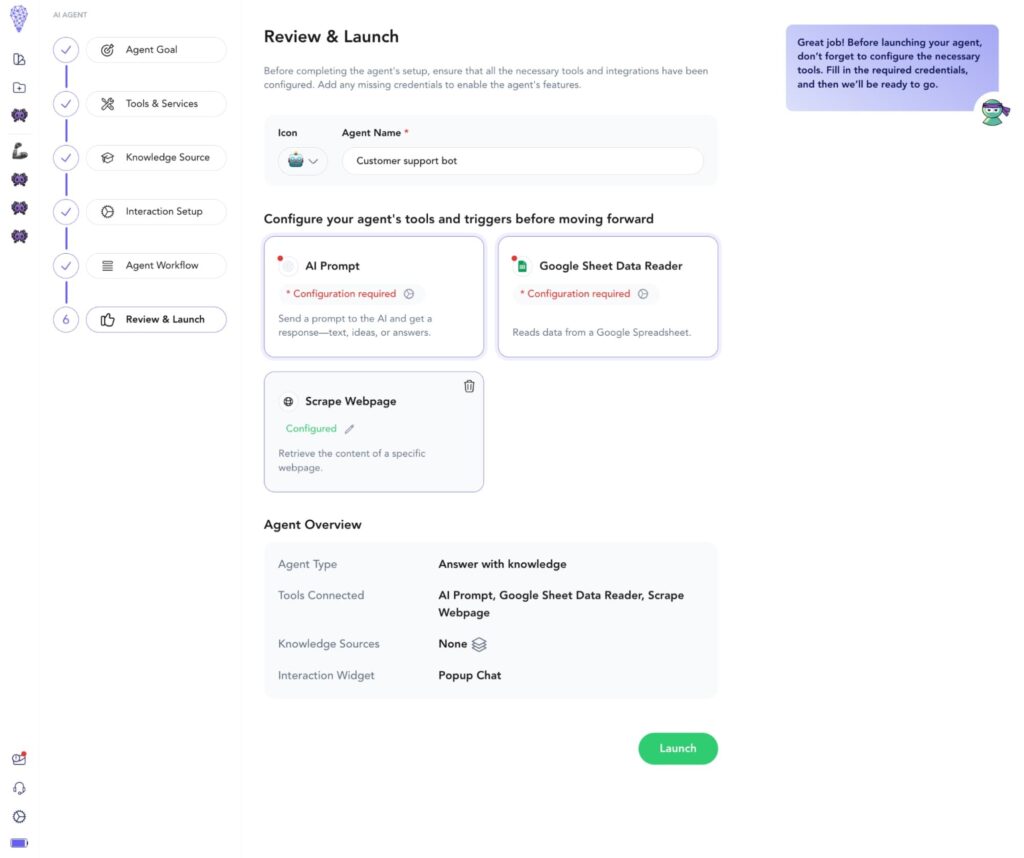
Step 11: Final Configuration and Launch
We’re at the last step!
Name and Identity:
- Choose an appropriate icon that represents customer support
- Name your bot “Customer Support Assistant” or something that reflects its role
- Make sure the name is clear and approachable for customers
Configure Your Selected Tools:
- AI Prompt Settings: Choose your preferred model (OpenAI, Anthropic, etc.) and configure response style to be helpful and professional
- Google Sheet Data Reader: Connect to your product databases and link to your Google Sheet
- Webpage Scraper: Set up access to knowledge base and enable FAQ and resource page scanning
Review Your Complete Setup:
- Agent Type: Answer with knowledge
- Tools Connected: AI Prompt, Google Sheet Data Reader, Webpage Scraper
- Knowledge Sources: Ready for your support materials
- Interaction Widget: Popup Chat
- Triggers: Webhook enabled for automated responses
Once everything is configured, hit that Launch button, and your AI support assistant will be ready to help your customers!
Leveraging an AI Customer Support Assistant is not just a luxury—it’s a necessity for modern business. By automating the repetitive task of answering common questions, you free up valuable time for both support agents and customers, creating a more efficient and focused support environment.
This technology doesn’t just lighten the load for your staff—it transforms the way customers engage with your business, providing instant, personalized support whenever they need it. Ready to reduce your staff workload, improve customer satisfaction, and elevate the support experience? The solution is simpler than you think—start building your AI Customer Support Assistant today!

How useful was this post?
Click on a star to rate it!
Average rating 0 / 5. Vote count: 0
No votes so far! Be the first to rate this post.
